Pages

Showing posts with label tools. Show all posts

Thursday, January 3, 2013

Techie Thursday: Popplet

New year, new themes I've decided.  I plan on keeping my theme of Market Mondays where I will post something that I have purchased for use in my classroom and give a quick review of it.  However, now that I'm also utilizing 1:1 iPads in the classroom, I decided that my theme of Website Wednesday no longer fit what I wanted to do. So.....(drum roll please) I've decided to now do Techie Thursday in place of it.

These posts will feature anything that has to do with technology - websites, apps, ideas, etc...  Of course I may post things that have to do with technology on other days as well but at least this will guarantee one technology post a week.


Today's Techie Thursday is all about one of my all time favorite apps that I use in the classroom with my students almost daily.  It's called Popplet.  This app is a visual tool to allow students (and adults) to visually organize their thoughts or data.  I mostly have my students use it as a graphic organizer tool to organize their writing.  However, check out the multitude of ways that Popplet creators see it being used in this screen shot taken from their website.  I'll admit I'm at the tip of the iceberg. There is so much more I could be doing with this tool!

Uses for Popplet

Let me explain a bit more.  You can easily download Popplet from the iTunes store.  There are two versions - the lite version which is free or the paid version which is $4.99.  Obviously with the lite version there are restrictions and I have found with my time using Popplet it is WELL worth the $4.99 they are asking for.  However, if you don't have an iPad or other Apple device don't let that deter you from checking this cool tool out.  They also have it available online at www.popplet.com.  You can create an account and begin making Popplets right away.   They do have a maximum limit of 5 Popplets that can be created but now you can sign up for a Popplet plan depending on how much you plan on using it.  They even offer school discounted pricing per student account. 

Students can create individual Popplets which only they can see and work on or they can do collaborative Popplets.  Below is an AWESOME example of one from the Popplet Facebook page that another teacher did with her students.


There are a variety of features available and this particular app is extremely easy to use and begin working with immediately.  You have the ability to change colors, import photos, videos, draw pictures and so on.  

Here is a video that eduTeacher created to show the basics of getting started in Popplet.


 In addition to their webpage, Popplet also has a Facebook page.  I highly recommend you also check that out.  It's awesome to see how teachers in ALL grade levels are using this tool in their classroom. 

Do you use Popplet?  What are some activities you've done? Share below!


Wednesday, February 15, 2012

Website Wednesdays: Weebly (and a biome project)

I'm always on the lookout for new ways to have my students create projects. And if they can involve technology - I'm usually sold.  Nothing gets my kids more fired up, than the thought of using a computer versus a pencil and piece of paper.  

So when it came time for my kids to study biomes and ecosystems, I knew that having them create a pamphlet just wasn't going to cut it this year.  Which leads me to today's Website Wednesday - Enter Weebly.  A fabulously (is that even a word? It is now!) free website that helps you....build websites. Ironic - I know. 

My students assignment was to create a website based upon the biome they were assigned and design a tourism site to inform potential travelers of the facts and sights they would see there.  These were their basic guidelines (*note - I did not create the original template of this project. I found it a few years ago and cannot locate the original author. I did, however, modify it to be a website project):

Home Page: Introduction
• Include a brief introduction to your biome to encourage them to visit the rest of the website.
•  Include why this Biome is globally important.

Page One:  Biome’s place on earth
• Where is it (geographical distribution)?
• What are its physical features?
• What are the native plants and their adaptations to live there?
• What are the native animals and their adaptations to live there?
• Give examples of cooperation and competition between and among species.

Page Two: Attractions/Tour Packages/Weather Report
• Advertise your biome’s recreational activities
• Publicize points of interest
• Suggest supplies/gear that tourists should bring to make their trip more enjoyable.
• Suggest other biomes nearby for side trips
• Weather Report (Used to aid tourists in packing their gear)
  • What is the average precipitation?
  • What is the average temperature?
Page Three: Warnings
• What are some threats to this biome?
• Are there any endangered species?
• Is there a fear of climate change for this biome?

Page Four: Sources Cited
• List where you found your information.


They make it easy to sign-up your school!
Weebly is a fantasic and easy resource for the students to quickly understand and begin working in.  Some of its best features include drag and drop editing, a collection of designs, no advertising (which is huge when talking about educational purposes), and the ability to put in rich multimedia.  At my school, we are lucky to have our email completely linked up to Google and all the awesome Google apps that come along with it.  Weebly is one of them, so my students could easily log in without me having to create sign-ins for them. 

Julia's Amazing Artic Website
You seriously just need to check it out today! In the meantime, here are some of my students' websites for your viewing pleasure. :-)


Share below how you would use weebly in your classroom!


Wednesday, January 18, 2012

Website Wednesdays: Edmodo

Today is the first of many Website Wednesdays, in which I will introduce and discuss fantastic websites I use in my 5th grade classroom! The website in which I want to talk about is Edmodo (www.edmodo.com). I'm a huge fan of Edmodo and have been using it with my students for the past two years. They have earned multiple awards, including the Award of Excellence in 2011 from Tech and Learning. However, I will admit that I have not probably utilized it to its fullest capabilities. My goal is to continue to explore this website and improve my students' learning with it.

In case you don't already know, Edmodo is an online learning platform which allows you to build classes and provide students (and parents) with individual logins. According to Edmodo's website,

 "Edmodo provides a safe and easy way for your class to connect and collaborate, share content, and access homework, grades and school notices. Our goal is to help educators harness the power of social media to customize the classroom for each and every learner."

Seriously - by reading that, what's not to love? :-)

When you create an account with Edmodo, you have the ability to create as many classes as you want. So for example, I can (and in the past have) create different classes for Social Studies, Math, Science, Writing and so on. Or if you teach multiple groups, you can create classes and have only a select group of kids join. Seriously, the possibilities seem endless. Oh....and have I mentioned the best part yet???? IT'S FREE!!!!!


A teacher view.
My students and I both enjoy using this site. This year, I created just two classes.  One for me to assign work, quizzes and polls and another class that we called "Talking" for the students to use to have their own discussions.  Edmodo allows me to monitor their posts so I can be certain nothing inappropriate is going on.  And because of its "Facebook" like look, students get really into it.  They create profiles and upload avatars. And I don't have to worry about someone who doesn't belong being able to see my students.


Let's review some 10 of Edmodo's capabilities.  They have much more than 10, but we'll start there. 

# 5 - Built in quiz creator!
1.  Able to create multiple classes for students with access codes.  This way, only the people you want to be in the class can join with the code.
2.  You can allow parents to login to the classes you create for students or you can even create one for just parents and communicate with them.
3.  You can assign and collect assignments and provide due dates which show up on the built in calendar.
4.  You can create polls!
# 6.  An example of my library.
5.  You can create quizzes and tests that the students take right on Edmodo.
6.  You can build a library of documents and websites and share them with students.
7.  You can award "badges" to your students.  (I haven't done this yet but the ideas seem endless.)
8.  You can join communities with other educators.  I enjoy visiting these and sharing ideas with other educators. Plus, I have found many great websites from this awesome community!
9.   Edmodo hosts webinars all the time to help educators maximize this site.
10.  They have a great app, so you can access this site even on the go.  This helps a lot because my students use this website as a means to communicate with me.  I have the ability to quickly respond back if needed.

Again, Edmodo can do so much more....these are just the basics.  If you haven't checked them out, I highly encourage you to do so.  And, in my opinion it's not just for upper grades.  I envision primary grades using this as a way to communicate with parents. Perhaps even more!

If you use Edmodo, what are some ways you utilize it?  Share down below in the comments section.

Monday, January 16, 2012

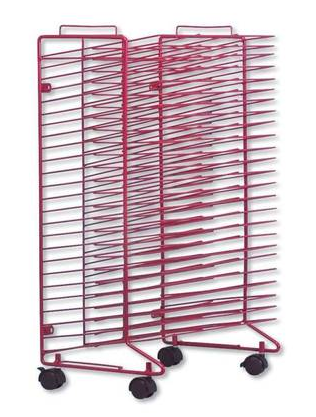
Market Mondays: Art Drying Rack

Here is the first feature of Market Mondays, in which I pick a product that I have used in my classroom and offer up a review.  Today's product is geared toward any teacher that teaches art or uses paints or other things that need to be able to dry in their classroom.

This year, I was determined to get a drying rack so I no longer had to have papers strategically placed throughout the classroom to dry after the students used either paint or something other medium that could possibly smudge.  Plus, I can't stand having miscellaneous papers left on a student's desk unless it's being used. I like things to be very neat and organized, so when I got the Sax Stack-a-Rack Drying Rack for my classroom, I knew it would be perfect!  This awesome product can be found on Amazon or at the Learning Outlet for under $100.

In order to better assist you, I broke down the pros and cons of this product for a quick review:

PROS:

  • 25 shelves
  • stackable so you can buy more than one and stack them on top of each other
  • Can be hung on the wall or put on wheels (I have my on wheels so I can move it about the classroom)
  • The perfect size for art projects on paper 11x17 or smaller
  • Doesn't take up a lot of room which is a huge plus when you have limited space in your classroom
  • Only $85.49 on Learning Outlet and you get FREE SHIPPING!
  • It came already assembled - all I had to do was throw the wheels on.
CONS:
  • The shelves do not lift up. Sometimes it is hard to see what shelf you are using and if there is a smaller piece of paper already there.
  • It only comes in red. This worked for me since my classroom I use bold primary colors. However, there are a lot of teachers who use softer pastels.  But upon further inspection, I believe you could easily spray paint this to match your color scheme.  
Despite those cons, I still award this product 4.5 out of 5 stars.  It would have received 5 stars in the shelves were able to flip up. But hey - for $86 this is one awesome product!!  

Next week's product: Really Good Stuff Chair Pockets


Related Posts Plugin for WordPress, Blogger...