Pages

Friday, April 20, 2012

Honoring Thy Mother

A colleague and I were just talking the other day and I mentioned that Mother's Day is coming up.....and fast!  You know what that means, time to start working on Mother's Day gifts with my class.  Thankfully, a few years ago I started doing a project and have done it ever since.  It's simple, thoughtful, cheap cost efficient, and there has never been a mother who hasn't LOVED it!  So I know you can't take the suspense anymore..................right?


Okay, here's what I do with my 5th graders.  First I give them an assignment to write a poem for their mother.  It can be an acrostic poem spelling out MOTHER or their mother's first name.  Or it can be a cinquain.  To be honest, it can really be whatever moves the student. I don't require that they rhyme but many of my students end up doing so anyway.  After they are done writing their poems, next I proofread them and have the kids make any corrections. Once they are perfect, they type the poems up on the computer and format it with the font and text color of their choice.

After the poem is complete, I take a picture of each of my students.  These pictures are printed along with the poem and placed in a frame which I purchase.  What I love about these frames is they are a heavy glass and give a feeling of expensive. However, I will let you in on a little secret.......they are NOT expensive at all!!!  I get all my Mother's Day frames at the 99 cent store or the Dollar Tree.  I'm not kidding!  These frames are really a buck or less.  I just add it to my growing list of things I already spend out of pocket. But in my opinion, these are so worth it. The students are so proud to take them home and like I said before - the moms love them.  I wrap the frames up in tissue paper for my students with a bow and they take them home.

Moms cry and weep......and send me emails about how much they love them. :-)  What do you do for Mother's Day gifts?  Share below.


Be sure to check back in a few weeks for my idea for a fabulous Father's Day gift.


After writing this post, Maria from Kinder-Craze told me about the Linky Party she is having for Mother's Day. Be sure to check it out for more Mother's Day ideas!  

Wednesday, April 18, 2012

The ABCs of the American Revolution

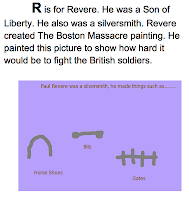
Example of ABC page
Every year my students learn about the American Revolution.  This is one of my favorite topics in our history book!  The students get to learn all about what started our great country.  I try to incorporate at least one big project per quarter within a couple of our subjects and the American Revolution is one of them.  This year, our school increased the number of days from 180 to 190 which means that I have 10 more schools day than I typically would.  This allowed me to have my students work on an assignment that they would 99% complete at school.  I prefer assignments like that because that let's me know that my students did the work themselves without their parents.  (Because we all know what parent "assisted" projects look like!) haha

As I searched for something new for my kids to do this year, I came across Mr. Viens project called ABC of American Revolution project.  While this project was geared towards 8th graders, I was able to make a few tweaks to suit my 5th graders.  However, I must admit I didn't cut out too much and was highly impressed with what was turned into me.  Students were required to first research the American Revolution using plain old fashion books.  They had their history textbook as well as about 15 books I have that have to do with the revolution.  Just like the ABC book series, they had to create a page for each letter of the alphabet.  There were some guidelines though - they needed to have the following:

  • 10 significant people of the American Revolution (listed in red on TOC)
  • 3 geographical locations (listed in green on TOC)
  • 7 key events (listed in blue on TOC)
  • 6 concepts (listed in purple on TOC)
Each page had to have a graphic on the page for the letter and 8 of them had to be self-created.  This proved to be a bit difficult for some of the groups and required some creativity on their part.  In addition to the letters A-Z, they needed to have a cover page, summary, dedication page, Table of Contents, a Did You Know Page, Significant Numbers of the Revolution and of course a bibliography.  Once they were done doing their rough draft on their note cards, they had to begin typing the final draft in Google Docs.  Overall, we took over 15 class hours for my students who worked in pairs on this project.  When finished, we printed and bound their books.
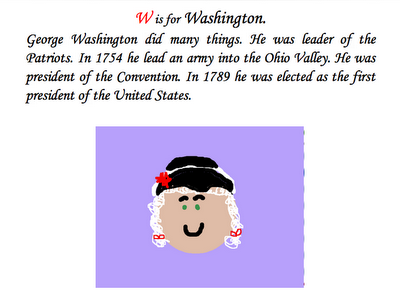
An example page created by one of my students with their own clipart.

The final outcome of the books were pretty awesome and I'll admit they came up with some information that I didn't even know.

Check out an example of one here: ABC American Revolution Book

Now that we are done with this, we get to go on our totally awesome field trip to Riley's Farm to experience the American Revolution.

What cool and fun projects do you do for the American Revolution?

Monday, April 16, 2012

Historically Scrappin'

One of my all time favorite Social Studies writing projects I do each year with my class is the Biography Scrapbooks.  Each year, students in my class choose one person they would like to read a biography on and create a scrapbook of their life.  I don't allow any duplicates within the class and the only requirement is that they have to pick someone who has contributed to society in some shape or form.  We talk about how different careers can contribute in different ways - from singers, artists, scientists, athletes...the list goes on and on.  Many times, they pick someone from the past who is long gone but sometimes they choose someone who is current and hip (this year I had someone do Selena Gomez and highlight her ambassador work with UNICEF).

After reading the book they chose, students continue doing research on that particular person filling in the Famous Person Report Outline that I provide them. This outline is very simple and to the point and instructs students on everything that they need to have in their report.  Once they have completed the outline, they begin working on the creative part - creating a scrapbook!  I usually have this part completed at home but always schedule time for research during school.

Now with the finished product I have done a couple different things.  For a couple years at another school I taught at, the entire fifth grade did a Wax Museum (there were five fifth grade classes - each did the written project different but we all participated in the Wax Museum).  Students were given a piece of butcher paper that was five feet long.  On the paper they had to write (in very large print) three clues about who their person was without giving the name of their famous person.  Below the clues, they drew a portrait of their chosen person too.  Finally, at the bottom of the paper they wrote the name of their famous person and covered it up with a flap of construction paper.  During the actual Wax Museum these pieces of butcher paper were hung up and down the hallways and the students dressed as their famous person and stood like wax figures in front of their papers for 10 minutes.  During that time, guests walked around the Wax Museum trying to guess who everyone was.  They were able to check if they were correct by lifting the flap of paper in the corner.  When time was up, guests were also invited back into the classroom for refreshments and to look at the scrapbooks that the students created.  At my new school, I no longer do the Wax Museum due to space and time. However, the scrapbooks are displayed during Parent/Teacher Conferences so that parents who are waiting for their time can browse through them.

Edmodo Evaluations
This year, I took the scrapbook project a step further by implementing an Edmodo component to it.  Each student in my class had to do a peer evaluation of their classmates' scrapbooks.  I have sixteen students, so each student's scrapbook was reviewed four times each.  After reading their classmate's work, students submitted a review on Edmodo for the scrapbook.  They had to write a paragraph keeping the following questions in mind: 
  • What did you enjoyed about their scrapbook?
  • What questions did you had after reading it?
  • What do you think they could have improved upon (constructive criticism only which we discussed as a class)

 After everyone was done evaluating each others' work, they had to go back and respond individually to each review their scrapbook received.  My students enjoyed both parts of this and I found that even my most reluctant writers has great reviews!


What is your favorite Social Studies project you do with your class?

If you are interested, my Biography Scrapbook Project is available on my TpT store - check it out.  And while there, be sure to check out all the freebies I have available too!

Wednesday, April 11, 2012

Website Wednesday: Schoolgirl Style

Okay, so typically my featured website on Wednesday aren't blogs or stores but when I stumbled across this teacher's blog I was floored!  My addiction to all things that are visually stimulating was in high gear when cruising Melanie Rulbusky's site.  Talk about a majorly talented designer (and by the looks of it, teacher too) - Melanie masters the art of making her classroom a welcoming place for her students.

I have always prided myself on my own room. It is 99% of the time extremely neat and organized and while I've always dreamed of making it more themed, I've always been typically happy with what I have managed to do.  But after seeing her site and ideas, I am now charged up to make some bright colorful and creative changes to my own classroom!  I can't wait to start my design board. :-)

Not only does Melanie create welcoming environments for her own students, she also shares her work with others for a nominal fee. And since time IS money for many of us, I think it's a fabulous and wonderful thing that she does sell them for other teachers to use.  Be sure to check out her latest creation - an Owl themed classroom.  She also has a Pinterest (of course) with more fabulous ideas.

Have you come across a classroom or design website that you just absolutely love? Share it below. 

Tuesday, April 3, 2012

smART Recycle

Yesterday, my 5th grade students were fully engaged in a fabulous art project - which was all about using recycled materials.  While I typically teach art once a week to them, we were lucky to have a parent volunteer come in and do a project with Kindergarten through 8th grade.  For the past couple of weeks, the school has been collecting recyclable materials to be used for this project which will be featured in our end of the year Art Expo.

Each class is pretending they have discovered a new species of tropical birds. From there they use the materials provided to create their bird.  Some classes used water bottles, others paper plates, etc. My class used a box as the body and went from there.  Before the boxes were first handed out, they were first spray painted in bright colors.  After that, students used toilet paper rolls cut in quarters for eyes and Q-tips for feet along with a bunch of other scrap and recycled material.  They used sticky tabs and tape to put their bird together and when finished, we reinforced it all with a hot glue gun.

Now, comes the next fun part! Creating a story about their bird - the students will create stories about how they found their bird, create a description and even name their bird.  They are still working on the actual design part, so we haven't moved on to the creative writing just yet.  However, I wanted to share their fabulous designs!

Have you ever used recyclable materials for an art project? What did you do??

Monday, April 2, 2012

Market Monday: Carry-All Caddy

I like my classroom neat and organized. Even parents of my students and future students know this about me.  So any product that can help me achieve this along with maximum color power (I'm a huge fan of bold colors!) included deserves a shout-out in my opinion.

The Carry-All Caddy from Lakeshore Learning fits my needs and wants and is by far one of the best organizational caddies for the classroom ever!  I love it so much that I have three of them. Yep...three.  Two of them organize all the crayons that I collect at the end of the year from my students. I can't bear to see crayons that are practically new (minus the sharp point) get thrown away, so if students aren't going to keep them I ask for them.  Any crayon that is broken goes into my scrap crayon bin for future crayon melt art projects.  The third caddy holds my colored pencils.  I organize all of these items by color within the eight jars.  I can easily stack the crayon caddies and the colored pencil one is placed right next to them. This way if a student is missing a particular color from their stash of colored pencils and crayons at their desk, they can simply come look to see if I have it.

So if you are perfectly anal retentive like myself, and absolutely need organization that is color coded you need to get yourself one (or three) of these!

What is your favorite organizational product in your classroom?  Post below.

Come back tomorrow for a fabulously smART Recycled Project how to.


Related Posts Plugin for WordPress, Blogger...