Pages

Sunday, March 16, 2014

Gmail Labels

Hello everyone!  I'm excited about a couple new things going on here at Teaching: The Art of Possibility.  The first one, as you may have already noticed is my new blog design.  Kassie, over at Designs By Kassie did it for me.  She is fabulous and I'm loving it!

The second thing is the new Teacher Training Bootcamp that I am particpating in with some fellow teachers out there.  Many of us are working on becoming Google Certified and I'm happy to say I passed the first of five tests.....this first one was on Gmail.  And while I have been using Gmail for quite some time, I'll admit there were quite a few things I didn't either take advantage of or even know about.  So stick around and read about just one of the fabulous features that Gmail has to offer.

Now if you have been using Gmail for awhile like I have, you have probably seen the many changes it has been undergoing.  One of my favorites which really helps me get more organized is the Labels feature.  Since I wear multiple hats at my school, I receive emails that fall under a variety of topics.  The labels feature allows me to mark my emails so that I can find them easily later on.  The best part about it, is you can add multiple labels to one email.  
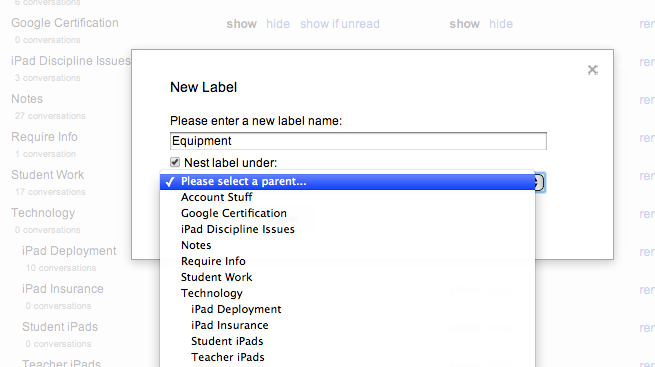
For example, since I'm in charge of all things technology related at my school, I order a lot of things for the teachers at our school.  I use labels to help me keep those organized.  I have the labels for
technology and under that I have additional labels for the different sub-categories that they related to.  Including "teacher iPads", "student iPads", "equipment", etc.   The labels allow me to find what I'm looking for quickly.  And as you can tell from my picture, creating labels and adding nesting titles is super EASY!

Now I was going to create a video tutorial to show you all how to do this, but when I came across this one below, I figured why recreate the wheel?  As a fellow teacher, I'm sure you can all appreciate that mindset.  So without further adio, check out this video and start labeling your emails to increase your productivity!


What are some ways you are going to use the labels feature in Gmail to better assist you at work?


Tuesday, March 4, 2014

Techie Tuesday: Dropbox

Some of you have sent me messages inquiring on how I use certain apps in my classroom with the 1:1 iPad setting.  So today, I want to talk about how I use Dropbox with my kiddos.

In case you didn't know, Dropbox is basically a virtual cloud in which you can upload all sorts of things ranging from documents to pictures and more.  You can share these files with other people, or access them from any device that connects to the internet.  Dropbox is available on the computer at www.dropbox.com or in app form on the iPhone, iPod, iPad and Android products (and more). 

It's safe, it's secure, and best of all it is FREE if you are using their basic subscription. 
Logging into account on iPad
You are given 2 GB with the free plan. This has always been more than enough for my class.  For my classroom setting, I wanted to use Dropbox as another way for students to share their work with me.  In turn, I use it as a place to upload audio files, pictures (commonly pictures of the math notes that I gave for that day), and other files that I want them to access.  I could of course share these things with them through email and Google Drive but I often find that Dropbox is a quick and efficient way for me to do it.  I regularly clean out our Dropbox with files that we no longer need with the exception of our math notes which remain in there all year. 

Cancel this - prevents photos being uploaded.
The first thing I did was create a generic Dropbox account.  (I also have one that is just for my use as a teacher but used a different email.) Since I have access to create email accounts at our school, I was able to create a 5thgrade@ourschooldomain.com email but you could do it using any regular email provider (gmail, hotmail, yahoo) or even use your school email.  I used that email with a generic password when creating our Dropbox account.  After I created the account I then provided the login and password to my students.  Using their iPads, they logged into the account.  I made them all cancel the automatic photo upload so any picture they took on their iPad wouldn't be automatically synced to our Dropbox. 

Easy to upload, create, and select & delete files.
The method is perfect for what I'm using it for.  It gives all of us a central location for things we need in class.  If a student has something on their iPad that doesn't need to be shared with me or the class, they simply use their Google Drive for that instead. 

It's easy to upload things directly from your computer or device.  You can even create folders within your Dropbox to keep things neat and organized. Once you have put files in, you can click on them and choose from a variety of options such as emailing, messaging, etc.  Or you can open the document in another app that you choose from a list. 

If you haven't already used Dropbox I highly recommend you check it out.  Even if you don't have a 1:1 program in place, it can be useful in the classroom and for a teacher!  So check it out today.


Related Posts Plugin for WordPress, Blogger...