I'm Katie Lyon and I'm a 2nd grade teacher, VP and blogger at Mrs. Lyon - Teaching: The Art of Possibility. On my blog, I share classroom tips, teaching ideas, and classroom resources. I'm a big fan of technology, and am in charge of our school's 1:1 iPad program. I share tech tips that can be applied to the classroom.
We've all seen them. Those black and white square boxes that remind us of barcodes on tags, books, etc. Now we find them all over! And in case you didn't know, they are called QR Codes. They can be found on movie posters, on the back of books, in magazines, on products we buy - simply every where! Every once in awhile you may scan one and find it takes you to a website which will show you perhaps an advertisement of some sort, a movie trailer or perhaps something different altogether.
The more I saw these boxes in the world around me, I tried to think of ways I could use them effectively in my classroom. As many of you already know, my students are piloting a 1:1 iPad program, so having a device that could read the QR Code was not an issue. I've started with just one class and eventually will use them in more subjects once the ideas hit me.
We've started with math class. So often I will teach a lesson and walk through multiple examples with my students only for them to go home and for whatever reason blank on what was taught. They'll come back the next day, I'll go over more examples and the light bulb (hopefully) goes off! I thought, wouldn't it be more effective for them to see examples the evening they are working on their homework? Absolutely (in my humble opinion)!
With that being said, I have now started to create short videos (I try to keep them 5 minutes or less) that are filled with examples from that day's lesson. Now, I know that I can find plenty of videos already created with the skills I'm teaching, however, our particular math program is very vocabulary heavy. So I make sure that when I'm creating the video, I'm using the vocabulary the students are also learning in class. Plus, the kids get a kick out of hearing my voice compared to someone they don't know. This way, I also know the videos won't one day be gone unless I get rid of them. I'm organizing all of my math QR Codes in a notebook where I glue in a
copy of the sheet I hand out to the students. This way, I will only
have to make a copy each year and not completely recreate them.
Creating the videos IS EASY! I use an app called ShowMe which is free but there are tons of other ones out there you can use. The nice thing about ShowMe is that I can easily record my video and upload it and it will immediately post it on the internet for me. From there, I take the web address they provided and go to Kaywa QR Code Creator. I simply cut and paste the web address in and click on Generate Free. It automatically makes me a QR Code which I then take a screen shot of and create a document of it (just copying and pasting it over and over so I have an entire sheetful). I print and cut out the QR Codes and the students glue them into their math notebook with their notes from that lesson.
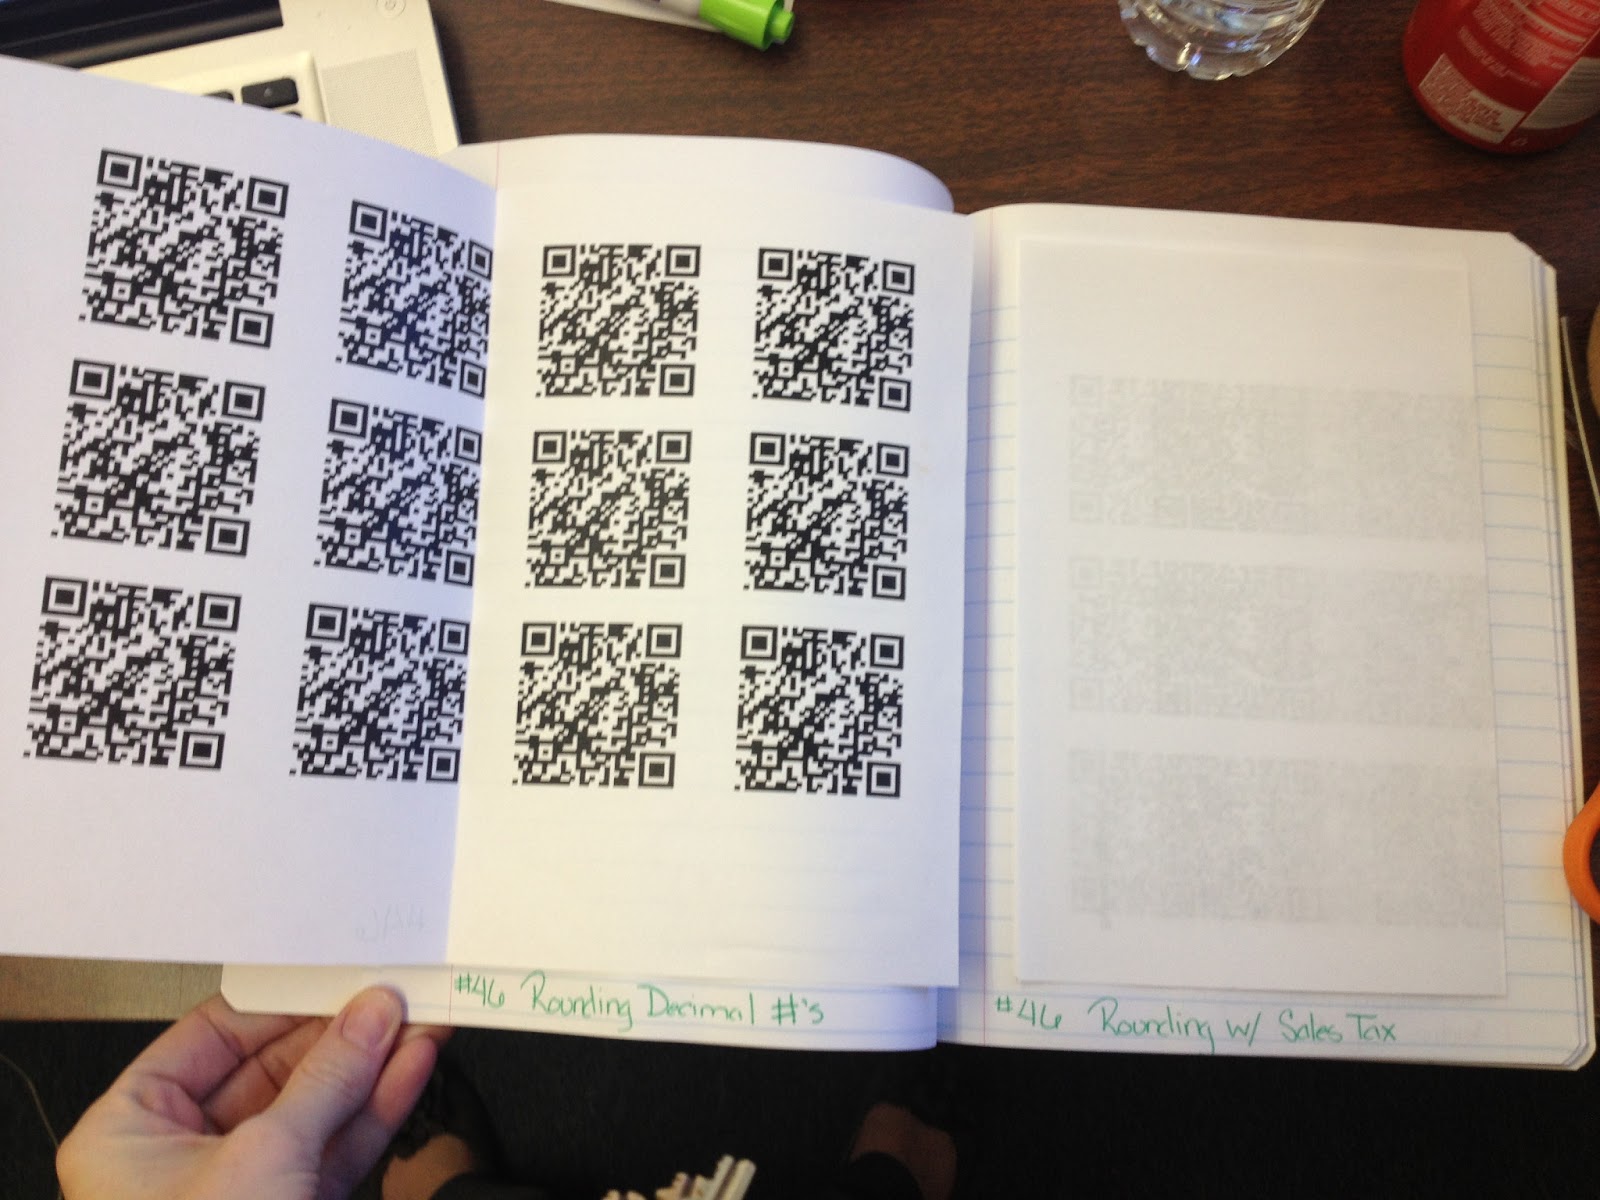
Kaywa QR Code Creator Website
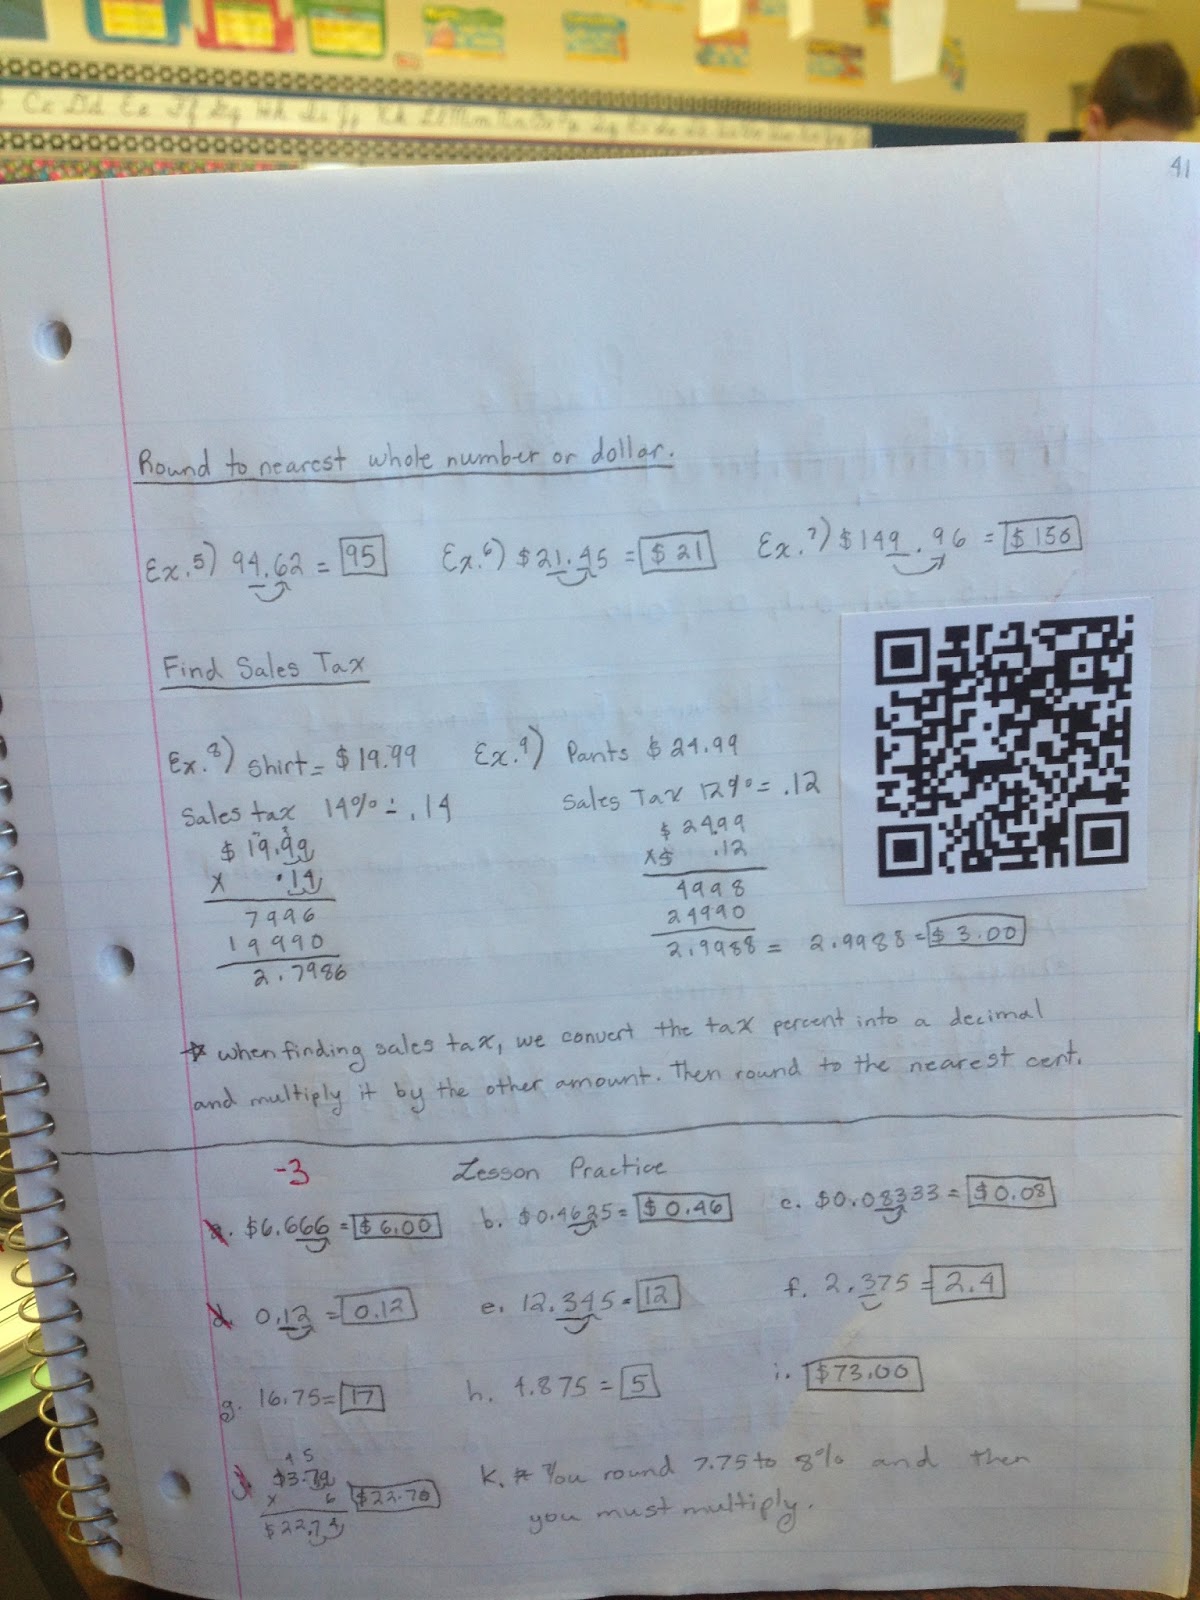
Students have on their iPad the App called Scan and when they want to see the video, they simply open up their notebooks and scan the QR Code. It will automatically take them directly to the video where they can watch it. The videos are nothing fancy and don't take long to make at all.
I've had a great response since I began doing this (only starting on Monday). And for students who were absent for some reason, this helps them too since they can still see examples being completed by me. I look forward to figuring out even more uses for this nifty little codes. I really think there are a ton of possibilities out there.
I even created sets of QR Code Task Cards for students to practice math and language arts. Check them out at my TpT store.
Do you use QR Codes in the classroom? Share below!
Prior to studying the 13 colonies and the American Revolution, we first cover the early explorers in 5th grade. I love ending the unit each year with a simulation created by Scholastic called Easy Simulations: Explorers. This book contains everything you need to have a fun and imaginative adventure with your students.
I begin the simulation each year by going through a Keynote with my kids explaining what a simulation is and the basics of the one we are going to do. This is where students are first introduced to the "characters" they can play and the ins and outs. I put them into groups of 4-6 (depending on the number of students I have in my class that year) and their first job is to create a name for their boat and design a flag for that boat. Here is an example from the past:
Once students have created their flag and have decided upon their "role" in the simulation, I hand out hats that I purchased relatively cheap. I have the Navigator wear a bandana instead of a regular sailor cap. This is the person who is the spokesperson for their ship and crew and bandana allows me to easily know who it is. Additionally, I purchase quills and ink sets for the students to take turns writing in their journal (see regarding journals below) at least once using an old fashion quill and ink. They LOVE THIS!! And it was a good investment - I've had the same ones for the past 4 years and they are still going strong.
One of my favorite journal entries
Finally the actual simulation begins - it takes place over five days and the book walks you through the different episodes. In the beginning students need to make decisions regarding which charter they care going to accept - Spain or Portugal. Both have pros and cons depending on what they decide to do. At the end of each episode, the students are required to write a journal entry describing the adventure they experienced. (This is where the students take turns writing with the quills and ink - they only get to do it once, not for all five). Students must write their entry in character which makes them always enjoyable to read. Some of my class really get into it!
Throughout the simulation a lot happens. There are decisions to be made, hardships to overcome, sickness and disease, mutiny of the crew, discovery of new lands and people and some of the group even lose their lives (which the kids always get a kick out of - some even write about pretend funerals that they end up having for their lost crew). Depending on the choices the group makes and a game of chance will determine whether or not they are successful.
Rubric
There are a lot of copies that need to be made for this simulation which is one of the reasons this year, I scanned the pages instead and uploaded them to Dropbox. The students then accessed the pages from there and using PDF notes opened the pages up and modified them on their iPads using their stylus. This way, the only printed out papers, were their journals. They used the Pages app to write their journal apps and uploaded them to me in Edmodo. (With the exception of their one journal entry which was done with the quill pens.)
Overall, this is a fabulous cumulative project to do. I love how the book has everything I need to successfully roll it out (including a rubric to grade them on) and yet allows me to add in little fun elements of my choosing. I always hear positive comments from my students about it and they always want to know when we are going to do another one. Enter Easy Simulations: American Revolution...... ;-)
New year, new themes I've decided. I plan on keeping my theme of Market Mondays where I will post something that I have purchased for use in my classroom and give a quick review of it. However, now that I'm also utilizing 1:1 iPads in the classroom, I decided that my theme of Website Wednesday no longer fit what I wanted to do. So.....(drum roll please) I've decided to now do Techie Thursday in place of it.
These posts will feature anything that has to do with technology - websites, apps, ideas, etc... Of course I may post things that have to do with technology on other days as well but at least this will guarantee one technology post a week.
Today's Techie Thursday is all about one of my all time favorite apps that I use in the classroom with my students almost daily. It's called Popplet. This app is a visual tool to allow students (and adults) to visually organize their thoughts or data. I mostly have my students use it as a graphic organizer tool to organize their writing. However, check out the multitude of ways that Popplet creators see it being used in this screen shot taken from their website. I'll admit I'm at the tip of the iceberg. There is so much more I could be doing with this tool!
Uses for Popplet
Let me explain a bit more. You can easily download Popplet from the iTunes store. There are two versions - the lite version which is free or the paid version which is $4.99. Obviously with the lite version there are restrictions and I have found with my time using Popplet it is WELL worth the $4.99 they are asking for. However, if you don't have an iPad or other Apple device don't let that deter you from checking this cool tool out. They also have it available online at www.popplet.com. You can create an account and begin making Popplets right away. They do have a maximum limit of 5 Popplets that can be created but now you can sign up for a Popplet plan depending on how much you plan on using it. They even offer school discounted pricing per student account.
Students can create individual Popplets which only they can see and work on or they can do collaborative Popplets. Below is an AWESOME example of one from the Popplet Facebook page that another teacher did with her students.
There are a variety of features available and this particular app is extremely easy to use and begin working with immediately. You have the ability to change colors, import photos, videos, draw pictures and so on.
Here is a video that eduTeacher created to show the basics of getting started in Popplet.
In addition to their webpage, Popplet also has a Facebook page. I highly recommend you also check that out. It's awesome to see how teachers in ALL grade levels are using this tool in their classroom.
Do you use Popplet? What are some activities you've done? Share below!
Since my class has been piloting the 1:1 iPad program at my school for the past 4 months, I have come across a lot of cool (and not so cool) apps. One of the best "tools" apps I have found is Reflector. Many of us have heard of Apple TV.....and even own one. (I do at home). They are great little gizmos. And the thought of being able to wireless connect your iPad to your Apple TV at school is a wonderful thing. Easily allowing you to stream movies, show your iPad screen, and more to your class. What's not so cool? The price! At $99, the Apple TV is an expensive technology gadget. And when you are working on a teacher's budget (gasp - or worse a district's!!!) that is a lot of money to pay. Especially when you need to factor in the cords and other accessories you need to make it work. This is where Reflector enters.
For the low cost of $14.99 (single user license) or $49.99 (5 person multi-license) you can download this fabulous app and have it do the same EXACT thing that Apple TV would do. It allows you to wirelessly mirror your iPhone or iPad to your Mac or PC. Unlike other apps, you download it to your actual laptop or desktop instead of your device. Then by simply hitting the home button on your iPad (or iPhone) and swishing to the left, you activate AirPlay. Instantly, mirroring your device! Display it through your LCD projector and your entire class can see what you are doing.
I use this app DAILY in my classroom. It allows me to walk students through what they should be doing, or quickly show them something cool. Better yet, I can have my students become the teachers and mirror their iPad by simply activating AirPlay on their device.
So let's break it down....
PROS:
Simply put - COST! At $14.99 you are saving almost $85 compared to the Apple TV.
Ease of installation and use. You can purchase, install and implement all without ever leaving your desk and within 10 minutes. Try to make it in and out of an Apple Store in that time!
Features - did I mention you can record what your doing to save for later? Imagine the possibilities! Allow students to access a lesson even after it's done.
You can download it on either a Mac or PC.
CONS:
Sometimes the connection is dropped. But for the amount of times I use this product and the number of times this has actually happened it really doesn't matter. Plus, from what I hear, the Apple TV has the same issue.
You can only connect either an iPhone or iPad - no other devices. For me, not that big of a deal since my school is an Apple product school. But for others who are not, this app would not work for you.
So, overall I truly give this product a 5 out of 5 stars. Check it out today - for $15 what do you have to lose?
Any other fabulous apps that you have found that work the same way? Share below!
To jump start myself back into blogging again, I'm joining up with a fun Linky Party that Lorraine at Fabulous 4th Grade Froggies is hosting. The idea behind it is that you post your first 12 posts of 2012. It was actually fun looking back, as I sometimes forget things I've posted. :-) Somehow throughout the year, I forgot about my themed days of Market Mondays and Website Wednesday.....I may just have to bring those back!
1/12/12 - Wiki With Us This post I talk about about my themed days and also introduce my wiki where I have a lot of my free products and ideas available to you.
1/16/12 - Market Mondays: Art Drying Rack This art drying rack is still by far the best one I've seen yet. A lot of my colleagues opted for the same one I had but a few got different ones. I still love mine the best.
1/18/12 - Website Wednesdays: Edmodo Edmodo is one of my all time favorite collaborative websites that I still use with my students. Especially since we now have 1:1 iPads in my classroom. If you haven't checked it out, you simply must.
1/25/12 - Website Wednesdays: Artsonia This next post is all about Artsonia. A fabulous website that you can use to search for fun art projects, post students' artwork into online portfolios AND earn money for your school.
1/26/12 - Building Elements
This was a fun little project I did with my students on the number of
protons, electrons and neutrons an element has. Oddly enough, I just
posted about this same unit yesterday regarding a new project I did this
year.
2/1/12 - Website Wednesdays: Classroom Freebies Too Here I talk about a great website where you can find a ton of things for free to use in your classroom. I'm no longer a contributor since I simply ended up not having the time due to the growing demands of my job and daughter at home but still love checking out this site to see what is posted.
2/6/12 - Market Mondays: Gumball Machine - Without the Gum! In this post, I talk about one of my classroom management tools that I use which is a huge hit with my class. They love taking a turn at our "Puffball Machine" to see how much Kenzie Kash they can earn.
2/7/12 - Grid Art Masterpiece Here you can read all about an annual art project that I do with every class. This year we did the art work "Scream". So much fun and I love seeing how it turns out.
Whoo - alright! There are my first 12 of '12! Check them out if you haven't already. And be sure to go back and look at some of my other ones. There are some hidden gems in there. :-) For even more great blog posts, head on over to Fabulous 4th Grade Froggies and check out what other bloggers have posted.
In science class my students just finished learning the basics on atoms and the periodic table. They are well apt at figuring out how many neutrons, protons, and electrons each element possesses. Towards the end of our unit, one of my students brought in a book that he thought I might be interested in seeing called The Elements: A Visual Exploration of Every Known Atom in the Universe. And what a fabulous book it was!
The book itself gives information on each element in the periodic table and provides one of the most colorful experiences I've ever witnessed on the this topic. I'll admit it was so intriging to look at all the pictures and to discover new things about the elements which I never knew. So.....it got me thinking. If I was this interested in the topic by looking at the book, would my students be too?
After doing a bit of research online, I came across a great cumulative project for our unit in which each student would pick an element that interest them and create a "Wanted Poster" for that element. More importantly, I wanted them to be able to use our iPad to create their project as well. After tweaking it a bit for my needs, I assigned the project. Click here to see the assignment details.
Sample Project from student
After each student chose an element they wanted to learn more about, I copied from the book, The Elements: A Visual Exploration of Every Known Atom in the Universe, for them to utilize in their research. In addition, students used the app called PeriodicTable. While it only has a 3 out of 5 star rating, the app for the most part provided more than enough information for my 5th graders for what they needed.
After students finished doing the research on their project and had filled out their rough draft, they worked in the Pages app to complete their final poster. I printed all their posters and students presented their work to the class. It was a lot of fun and very informative to learn about all the elements they picked.
What projects have you done with your students that involved the Periodic Table and elements? Share below - I'd love to hear about them.
I realized it has been quite some time since my last post. Five weeks ago, I was busy setting up my classroom, getting ready for my students and about to undertake a huge pilot program for the school......our 1:1 iPad program!
While I'm so excited and thankful that my grade was chosen to pilot the program, it has also been a lot of work and research on my end to be sure that things are done properly. Yes, I have encountered glitches along the way and definitely had students do things on the iPad that I wonder what the heck I was thinking but overall it has been a wonderful experience. I look forward to sharing my experience with all of you and welcome any advice you may have.
One of the first things we had to do, was create a student iPad pledge. Since the iPads are the property of the school but students would be allowed to take them home, it was important for us to set some guidelines for our students. If you Google "student iPad" agreements, you will get a ton of hits.....which is exactly what I did to begin with. Once I had a few samples to work with, I sat down and reflected on what would be best for our school and population of students.
This is what we came up with.
We reviewed the iPad pledge together as a class and talked about each point and why it was important. Parents also have to review the document and sign off on it as well. Today, is actually the first day that the students will be bringing the iPads home. Here's hoping students honor and abide the pledge. ;-)
Do you have an agreement that you make students sign-off on for electronic devices?